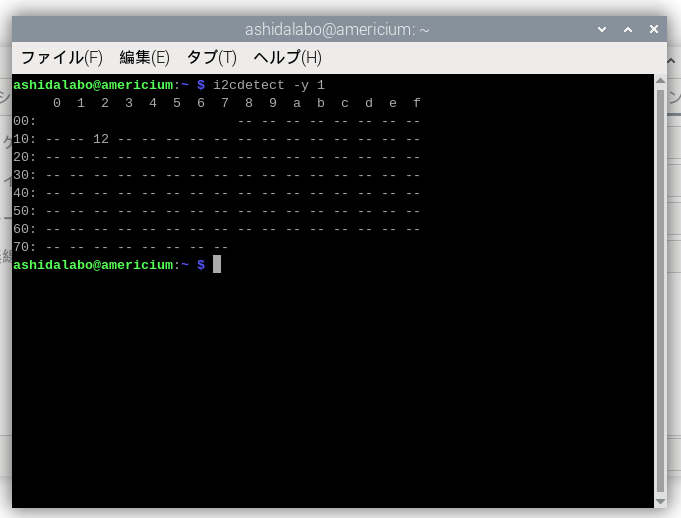
下の図はRaspberry PiのI2C端子にTF Mini Plusを接続した様子です.0x12のところにTF Mini Plusがあるようです.ここまではいい感じです.

この後,I2C経由で距離を得るための方法について調べたところ,こちらのフォーラムにたどり着きました.この中に書かれていた下記プログラムで距離が得られそうです.
# For TFmini Plus
from smbus2 import SMBus, i2c_msg
import time
import random

# To get the addresses of detected devices type:
# sudo i2cdetect -y 1 or 0

# I2C bus number. For a raspberry pi 3
# this should be 1, older raspberry pi's
# this could be 0
I2CBUS = 1

# LiDAR Address
ADDRESS = 0x12

# min and max are in centimeters
SIM_MIN = 90.17 # centimeters
SIM_MAX = 92.71 # centimeters

class TFMiniPlus:

    def __init__(self, i2c_address=ADDRESS, bus=None, simulate=False, sim_min=SIM_MIN, sim_max=SIM_MAX):
        self.addr = i2c_address
        self.sim_min = sim_min
        self.sim_max = sim_max
        self.simulate = simulate
        if not simulate:
            if bus is None:
                self.bus = SMBus(I2CBUS) # Initialize I2C
            else:
                self.bus = bus
            # end if
        # end if
    # end __init__

    # Write a single command
    def write_cmd(self, cmd):
        self.bus.write_byte(self.addr, cmd)
        time.sleep(0.0001)
    # end write_cmd

    # Write a command and argument
    def write_cmd_arg(self, cmd, data):
        self.bus.write_byte_data(self.addr, cmd, data)
        time.sleep(0.0001)
    # end wripte_cmd_arg

    # Write a block of data
    def write_block_data(self, cmd, data):
        self.bus.write_i2c_block_data(self.addr, cmd, data)
        time.sleep(0.0001)
    # end write_block_data

    # Read a single byte
    def read(self):
        return self.bus.read_byte(self.addr)
    # end read

    def read_data(self, cmd):
        return self.bus.read_byte_data(self.addr, cmd)
    # end read_data

    # Read a block of data
    def read_block_data(self, cmd):
        # return self.bus.read_block_data(self.addr, cmd)
        return self.bus.read_i2c_block_data(self.addr, cmd, 0)
    # end read_block_data

    def get_reading(self):

        # get the first timestamp
        ts1 = time.time()

        if not self.simulate:
            # block object to store the readings
            block = list()

            # returns a dictionary with the reading data
            COMMAND = [0x5A, 0x05, 0x00, 0x01, 0x60]

            # writes the command block to the device,
            # expecting the reading back
            self.write_block_data(0x00, COMMAND)

            # sleep a short time waiting for the device
            time.sleep(0.01)

            # loop through and get the return data back
            for a_byte in range(0, 9):
                byte = self.read()
                block.insert(a_byte, byte)
            # end for

            # check the headers
            if block[0] == 0x59 and block[1] == 0x59:
                #print("printing python3 compatible part")
                distance = block[2] + block[3]*256
                strength = block[4] + block[5]*256
                temperature = block[6] + block[7]*256
                temperature = (temperature/8) - 256
            # end if
            if block[0] == "Y" and block[1] == "Y":
                distL = int(block[2].encode("hex"), 16)
                distH = int(block[3].encode("hex"), 16)
                stL = int(block[4].encode("hex"), 16)
                stH = int(block[5].encode("hex"), 16)
                distance = distL + distH*256
                strength = stL + stH*256
                tempL = int(block[6].encode("hex"), 16)
                tempH = int(block[7].encode("hex"), 16)
                temperature = tempL + tempH*256
                temperature = (temperature/8) - 256
            # end if
        else:
            distance = random.uniform(self.sim_min, self.sim_max)
            strength = 300.0
            temperature = 80.0
        # end if

        # gets the second timestamp and the difference
        ts2 = time.time()
        ttr = ts2 - ts1
        data_block = {
            "distance" : distance,
            "strength" : strength,
            "temperature" : temperature,
            "ttr" : ttr
        }
        return data_block
# end class

tf = TFMiniPlus()
print(tf.get_reading())
実行すると,距離や温度などが得られることを確認できました.あとはこれをPICのC言語へ落とし込めばというところです.
コマンドラインi2c***でどうにかならんか検討したところ,次のようにすればi2cdump -y 1 0x12動作しました.
i2cset -y 1 0x12 0x5A 0x05 0x00 0x01 0x60 i
i2cdump -y 1 0x12
0x5A 0x05 0x00 0x01 0x60は,データシートによるとI2Cのときにデータを取得するために用いられるコマンドの様です.そのコマンドを送ったのち,値を取りに行けばよいみたいです.上の例ではi2cdumpを使いましたが,i2cgetで1バイトずつ取得しても大丈夫でした.
